V is for…Visualisation! How The Stave and the Piano Keyboard Can Be Seen As One
- Jack Mitchell Smith

- Aug 13, 2025
- 6 min read
I often doubt that I know many if any other words that begin with the letter ‘V’ in my…repertoire of words (so nearly an own goal…)…but Visualisation is a word that comes up time and time again in lessons I give to people, and it’s a skill that I think will always benefit musicians of every walk of life. The ability to find your way around the keyboard, fretboard, valves (ooh - two words!) etc. without looking or even without playing (power of the mind!) is of enormous benefit to us musicians as it really brings a feeling of second nature to our performing when it does come time to perform.
I can’t speak too much for any other instrument apart from piano (and other keyboard based instruments, of course), but I have no doubt that all instruments have their own little quirks that can be adopted in similar ways. However, piano is a genius instrument for visualisation when it comes to reading music because:
It goes from low to high, which sounds obvious but is not necessarily the case with a lot of instruments such as winds and brass.
Notes follow one after the other in semitones, meaning that there are never any exceptions to how you count up or down certain intervals. Again, sounds obvious but, again…see previous point!
In this blog, I’d like to explore the way that we can use the power of visualisation to see how the stave and the piano keyboard work together to make sight reading less of a seemingly random chore but more of a logical, methodical and - in time - relatively straightforward task.
Stick with me as we delve into this!
What is the Stave?
The Stave / Staff (always pronounced as ‘staff’, mind’) is our familiar group of five horizontal lines on which notes are placed. The lower down on the stave a note, the lower in pitch it is and vice versa.
Now let’s take a very familiar set of notes on the stave - the C major scale.

In treble clef, reading from the bottom we will be starting with:
(middle) C, D, E, F, G, A, B .
Note how all of the notes rise up one at a time, either moving into the above gap or onto the above line.
Now play this scale.
What do you notice?
If you said you’re using entirely white keys - correct!
If you further said…there are five notes (the five black keys) that aren’t accounted for here…you would also be correct!
So in conclusion, we can safely say that the notes move up one at a time according to the key signature’s respective scale.
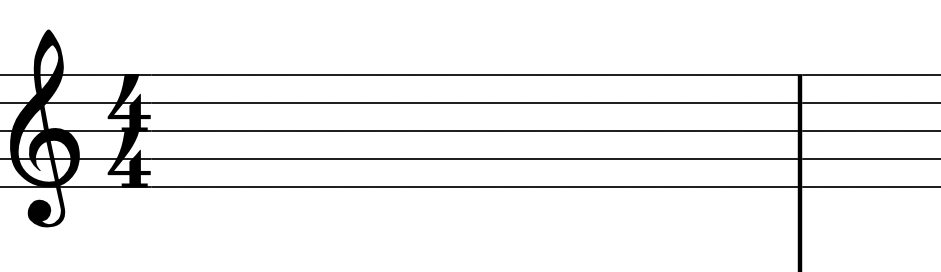
Note how there is no reference to any sharp or flat notes between the clef and the time signature (4/4)? That tells us automatically that we are in C major or it’s relative minor (A minor), but as both share the same rules (i.e. the same sharps and flats) then it will move logically up or down according to either scale (in the key of either C major or A minor, we’re talking white keys only).
So let’s explore how a slightly more complex scale might look and use the key signature of A major:

In the scale above, we have three sharps to identify our key signature between the clef and time: F♯, C♯ and G♯ . This creates the key of A major (reference the circle of fifths to assist if you’re unsure how to reach that conclusion).
In terms of just how the notes fall on the lines, you’ll notice exactly the same situation: they all go up one line or space at a time, thus backing up the conclusion that we move one note up at a time in the respective scale of the key (our F, C and G will all be sharps, remember!).
Needless to say, it’s a great idea to familiarise yourself with all the scales anyway! However, to make it slightly more accessible from a beginner’s standpoint then try and only sight read in keys correlating to scales you already know, or if you’re feeling a little more ambitious then try and learn the correlating scale to a new key fairly efficiently to help you sight read…
…because the following visualisation is going to come in super, super handy on that front!
Visualisation of the Stave and the Piano Keyboard
Naturally, I’m going to demonstrate this using C major to start as it is how I started previously.
As we’ve discussed, every line and space up is a new note in the scale.
So if we aligned our staff (treble clef) against a keyboard, assuming that the lower C on the diagram below is middle C, we can see how this looks:

And if I were to do the same with A major, assuming the lower A is the A just below middle C, it may look like this:

Like I say, familiarity with the scales correlating to the key signature is essential so that your rational whilst reading this is not necessarily to always jump up to the next white key. The more you practise scales, the more strongly you will identify and feel comfortable with their overall shape, making your fingers naturally want to gravitate towards the sharps or flats in question.
Visualisation in Practice
Scales
Quite often in music we are faced with ‘scalic passages’, which sounds a lot more slimy than it is.
A scalic passage is a passage that moves up and / or down the notes of the scale. This is a very basic understanding of how visualisation can work and is one that I try and encourage pupils to start adopting from the off, as opposed to always trying to identify the notes individually.
Intervals
As you start to progress, you will start to widen the jump between one note and the next, whether you play one note after another or two at the same time.
Of course, you can identify intervals by just counting the spaces and lines between (making sure to include the lines / spaces on which your bottom and top note rest):

But this isn’t the strongest visualisation.
Remember that all lines and spaces are individual notes of the scale, so bearing our scale in mind, we can immediately see ‘missed notes’ in front of us.
For example:
This would be a third because we can visually see that this is a ‘play a note, miss a note, play a note’ job.
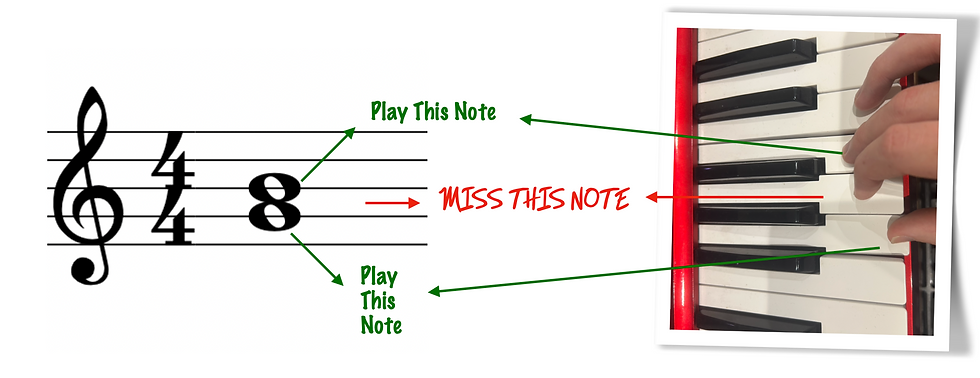
If we see the following:

We can recognise that you are missing two notes, so play the bottom note, miss two (represented by a line and a space) then play the next.
Flipping back to the key of A major, we have to now be mindful of the A major scale:

But even without considering what sharps we need to deal with, we can see that we are missing out four notes between.
Chords
When you start to stack intervals together, it can lead the the exact same process:
Your typical triad chords are formed by playing a note, miss a note, play a note (such as C - E - G in the C major scale). So what would that look like on paper?
Well, I’m sure you already know, but here’s an example starting from middle C! -
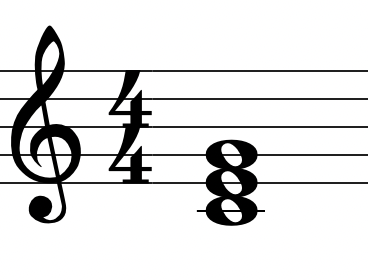
So now you can visualise triads instantly.
Remember your sharps in A major and make sure you bear them in mind as you read the following:

It’s a play, miss a note, play, miss a note, play job again!
So in this case we’d be looking at D - F♯ and A (remember the scale!)
Strengthen Your Visualisation Even More
In order to be the absolute greatest that you can be, remember that practising and learning of piano doesn’t necessarily have to be done…at the piano.
Your mind is incredibly powerful.
Ask yourself this - can you visualise a piano keyboard? Doesn’t have to be an 88 key length, but can you at least see an octave in your mind, complete with black notes?
As you work through these intervals and chords, try and visualise the scales in your mind without playing them. This can really strengthen your natural instinct.
And if that’s a bit tricky to begin with, try printing off a blank piano keyboard and highlighting (or using pencil so you can rub it out!) the notes, intervals etc. that you wish to familiarise yourself with against what you see written on your score.
Jack Mitchell Smith is a piano teacher based in Congleton, Cheshire. Click here to find out more.
Weekly blogs are posted that may help you with your musical or piano journey. Click here to sign up to the mailing list so you never miss a post!


Comments